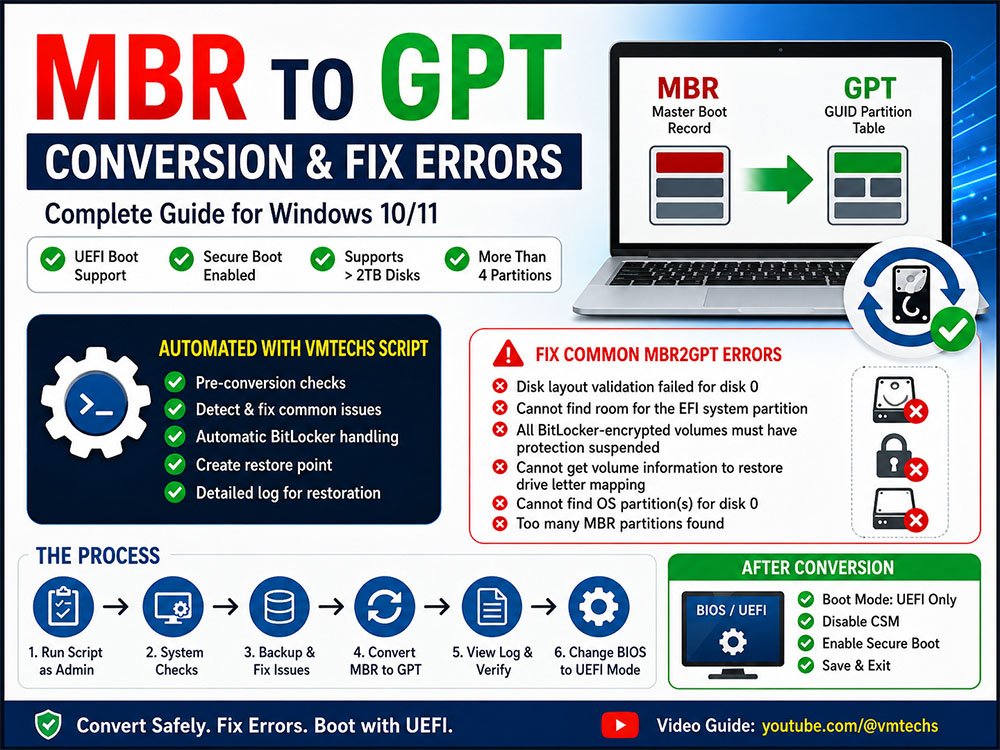
If you have ever tried to modernize your disk structure by converting from MBR to GPT in Windows 10, you know how frustrating it can be when the process halts midway. Error messages like “Disk layout validation failed for disk 0”, “Cannot find room for the EFI system partition”, or “Cannot get volume information to restore drive letter mapping” are common roadblocks that leave many users stuck in Legacy BIOS mode.
The good news is that you do not need to wipe your drive or reinstall Windows to fix this. With the right approach and tools, you can convert your disk partition style safely, preserve all your data, and enable UEFI booting required for features like Secure Boot and Windows 11 compatibility.
In this guide, we will walk you through the entire conversion process using the VMTechs Auto MBR2GPT utility. We will also deep-dive into specific fixes for the most common errors, explain how to adjust your BIOS settings post-conversion, and cover essential recovery steps to ensure your system runs smoothly afterward.
Watch the Step-by-Step Video Tutorial
For a visual walkthrough of the conversion process and error fixes discussed in this article, watch the full video tutorial below.
Why Convert from MBR to GPT?
Before we jump into the technical steps, it is helpful to understand why this conversion is worth the effort. The Master Boot Record (MBR) is an older partitioning standard that comes with significant limitations, such as a maximum disk size capacity of 2TB and a limit of four primary partitions.
The GUID Partition Table (GPT) is the modern standard. It supports larger drives, allows for more partitions, and is required for UEFI firmware. Switching to GPT not only improves data integrity with redundant partition table storage but also unlocks faster boot times and enhanced security features like Secure Boot.
Prerequisites: What You Need Before Starting
To ensure a smooth conversion process, please verify the following before proceeding:
- Windows 10 Version: You should be running Windows 10 version 1703 (Creators Update) or later.
- Backup: While this method is designed to be non-destructive, always back up critical data before modifying disk partitions.
- UEFI Support: Confirm that your motherboard supports UEFI boot mode. Most systems manufactured after 2012 do.
- The Tool: Download the VMTechs_Auto_MBR2GPT.zip file from the link below.
Step 1: Running the Auto MBR2GPT Script
The built-in Windows mbr2gpt.exe command is powerful but unforgiving. The VMTechs automated script wraps this tool with error handling and automatic fixes. Here is how to use it:
- Extract the File: Once downloaded, extract the contents of the VMTechs_Auto_MBR2GPT.zip file to a folder on your desktop.
- Run as Administrator: Locate
Online_VMTechs_Auto_MBR2GPT.cmd, right-click it, and select Run as administrator. - Automatic Checks: The script will immediately scan your disk layout. It checks for logical partitions, free space, BitLocker status, and boot configuration data (BCD).
- Confirmation: If all checks pass, it will create a System Restore point. You will be asked to confirm that your hardware supports UEFI and that you are ready to change BIOS settings after the conversion.
- Conversion: Once confirmed, the script executes the conversion.
- Log File: A log file will be generated in the folder. Do not delete this file. It is crucial for the post-conversion restoration steps.
If the pre-checks fail, the script will not abort. Instead, it will guide you through interactive fixes for the specific error encountered. Below, we detail how to handle each specific error scenario.
Troubleshooting Common MBR2GPT Errors
Even with automation, specific disk configurations can trigger errors. Here is how to resolve the most frequent issues.
1. Fixing “Disk Layout Validation Failed for Disk 0”
Disk Layout Validation Failed for Disk 0 is a generic error that usually points to an unsupported partition structure, often caused by logical or extended partitions. MBR2GPT requires a simple primary partition structure.
The Solution:
- Automated Fix: When you run the script, it will detect the logical partition. It will offer to back up the data from that partition to your Windows drive, a second internal drive, or an external USB drive.
- Space Requirements: If your Windows partition has enough free space, the script moves the data there. If not, connect an external USB drive.
- Restoration: Once the logical partition is removed and the conversion succeeds, the script can automatically recreate the logical partition during the post-conversion phase.
Manual Alternative:
If you prefer not to use the script for this step, you can use Windows Disk Management to delete logical volumes manually after backing up their data. However, using the script ensures the partition table is rebuilt correctly later.
2. Fixing “Cannot Find Room for the EFI System Partition”
The conversion process requires unallocated space (usually around 100MB) to create the EFI System Partition (ESP). If your C: drive is completely full, the conversion will fail.
The Solution:
- Automated Cleanup: The script will first attempt to clean temporary files and Windows Update caches.
- Deep Cleanup: If space is still tight, the script can disable hibernation and remove the page file temporarily. These two files (
hiberfil.sysandpagefile.sys) often consume several gigabytes. - Restart: You may need to restart your computer for these changes to take effect. Once restarted, run the script again.
Manual Tip:
You can manually free up space by running Disk Cleanup as administrator and selecting “Clean up system files.” Delete “Windows Update Cleanup” and “Temporary Files.”
3. Fixing BitLocker Encryption Errors
If you see “All BitLocker-encrypted Volumes on the Disk Must Have Protection Suspended”, the conversion cannot proceed while drive encryption is active.
The Solution:
- Script Handling: The VMTechs script detects BitLocker status automatically. It will ask for permission to suspend protection temporarily.
- Manual Method: Open Command Prompt as admin and run:
manage-bde -protectors -disable C:
Enter your recovery key if prompted. After conversion, you can re-enable it via Control Panel.
4. Fixing “Cannot Find OS Partition(s) for Disk 0”
This error suggests the tool cannot locate the Windows boot environment. It is often caused by a corrupted BCD store, missing boot files, or a broken Windows Recovery Environment (WinRE).
The Solution:
- BCD Repair: The script will attempt to rebuild the Boot Configuration Data interactively.
- WinRE Repair: If the recovery environment is damaged, the script may prompt you to run a dedicated WinRE repair tool first. It is highly recommended to fix WinRE before attempting the conversion again, as a missing recovery partition can cause boot issues later. Read this topic to see how to repair your WinRE automatically.
- Boot Files: The script handles errors like “Failed to install new boot files” by resetting the boot mapping.
5. Fixing “Too Many MBR Partitions Found”
MBR supports a maximum of four primary partitions. GPT conversion requires creating a new EFI partition, so if you already have four, there is no room for the new one.
The Solution:
- Recovery Partition: The script can identify the Recovery partition (usually one of the four). It will offer to back up and remove it temporarily.
- Confirmation: Type
1and press Enter to confirm removal. - Recreation: After the conversion and UEFI boot are successful, the script will recreate the recovery partition automatically during the post-conversion step.
How to Change BIOS Settings After Conversion
Once the script finishes, your computer will not boot until you switch the firmware mode. This is a critical step that many users miss.
- Shutdown: Completely shut down your computer after the script finishes.
- Enter BIOS: Power on and immediately press the BIOS access key repeatedly (common keys: F2, Del, F10, F12, Esc).
- Boot Mode: Locate the Boot Mode or UEFI/BIOS Boot Mode setting. Change it from Legacy (or CSM) to UEFI Only.
- Disable CSM: If you see a Compatibility Support Module (CSM) option, disable it.
- Secure Boot: Optionally enable Secure Boot for enhanced security (required for Windows 11).
- Save and Exit: Press F10 to save changes and restart.
Your system should now boot into Windows using the new GPT partition style.
Advanced: Using the Offline Script
There are scenarios where the online script cannot run within Windows, such as malware infections or unsupported Windows versions.
For Infected Systems
If malware is preventing the script from running in Windows:
- Hold Shift while clicking Restart to enter the Windows Recovery Environment (WinRE).
- Go to Troubleshoot > Advanced Options > Command Prompt.
- Type
notepadand press Enter. - In Notepad, go to File > Open. Change “Files of type” to All Files.
- Navigate to your script folder, right-click the Offline_VMTechs_Auto_MBR2GPT.cmd script, and select Run as administrator.
For Unsupported Windows Versions
If you are on Windows 10 build 15063 or earlier, the mbr2gpt command does not exist natively.
- Create a bootable USB using a Windows 10 ISO (version 1703 or later).
- Boot from the USB and select Repair your computer.
- Open Command Prompt and launch
notepad. - Use Notepad to browse to your script file and run the Offline_VMTechs_Auto_MBR2GPT.cmd file as administrator.
Post-Conversion Steps: Restoring System Features
The process isn’t quite finished once you boot into Windows. To ensure full functionality, you need to run the restoration phase.
- Run the Script Again: Once logged into Windows in UEFI mode, run
Online_VMTechs_Auto_MBR2GPT.cmdas administrator again. - Automatic Restoration: The script reads the log file created earlier. It will:
- Re-enable hibernation if it was disabled.
- Recreate the Recovery partition if it was removed.
- Rebuild logical partitions that were temporarily deleted.
- Restore page file settings.
- Final Check: Verify that your system is stable and all drives are accessible.
Alternative Methods for MBR to GPT Conversion
While the automated script is the safest method for most users, there are other ways to achieve this conversion.
1. Native Command Line (Manual)
You can use the built-in Windows tool without the script if your disk layout is simple.
- Open Command Prompt as Admin.
- Validate:
mbr2gpt /validate /disk:0 /allowFullOS - Convert:
mbr2gpt /convert /disk:0 /allowFullOS
Note: This method offers no automatic error fixing.
2. Third-Party Partition Managers
Tools like AOMEI Partition Assistant or MiniTool Partition Wizard offer GUI-based conversion. These are user-friendly but often require paid licenses for the MBR-to-GPT feature without data loss.
3. Clean Install
The most drastic method is to back up all data, wipe the drive, install Windows fresh using a UEFI-bootable USB, and restore your data. This guarantees a clean GPT structure but requires significant time for reconfiguration.
Frequently Asked Questions
Q: Will I lose my data during this process?
A: No. Both the VMTechs script and the native MBR2GPT tool are designed to convert partitions without deleting files. However, a backup is always recommended before disk operations.
Q: Can I revert from GPT back to MBR?
A: Windows does not support non-destructive GPT-to-MBR conversion. You would need third-party tools or a clean install to revert.
Q: What if my PC doesn’t support UEFI?
A: If your motherboard is strictly Legacy BIOS, you cannot boot from a GPT disk. Verify your hardware capabilities before converting.
Q: Is Secure Boot mandatory?
A: No, but it is recommended for security and is required if you plan to upgrade to Windows 11.
Final Thoughts
Converting from MBR to GPT is a significant upgrade for your system’s stability and future compatibility. While errors like “Disk layout validation failed” can be intimidating, they are solvable with the right tools and knowledge. By using the VMTechs Auto MBR2GPT script, you automate the complex troubleshooting steps, ensuring a smooth transition to UEFI booting without the risk of data loss.
Remember to complete the post-conversion steps to restore your recovery environment and system features. If you encountered any issues during the process, refer back to the specific error sections above or watch the video tutorial for visual guidance.
Did this guide help you convert your disk successfully? Share your experience in the comments or share this article with others who might be struggling with MBR2GPT errors.
Watch the Complete Video Tutorial
Follow the detailed video guide below to see the entire MBR-to-GPT conversion process in action, including solutions for the most common MBR2GPT errors covered in this article.
Great content! Keep up the good work!
Thank you for your feedback!