To enable the proper functioning of your HP laptop or desktop, to ensure optimum hardware compatibility, and to maintain security, it is very important to keep your BIOS up to date. In this guide, we’ll show you how to update your BIOS safely and properly so your computer can run smoothly and effectively.
Why Update Your BIOS?
Here are several reasons why you should update your BIOS:
- Stability Enhancement: Crashes and bugs related to your motherboard are fixed.
- Hardware Device Compatibility: Allows support for the latest hardware components: CPUs, GPUs, storage drives, etc.
- Security Updates: Fixes vulnerabilities to secure your system against potential risks.
- Feature Enhancements: Adds features such as Resizable BAR to graphics cards.
Although BIOS updates may not be required every time, they will contribute significantly to the performance and reliability of your system.
Methods to Update BIOS on HP Computers
Generally, HP devices have three main methods to update the BIOS:
- Direct EXE Installation: Update BIOS while having the operating system running on Windows:
- USB Flash Drive: If your PC is unbootable, you can use a USB drive to flash BIOS update.
- BIOS Setting Menu: Envoking the BIOS settings menu by pressing F10 at startup
- Automatic Update: Some Hp computers will do an automatic update if needed.
In this guide, we’ll be covering how to update the BIOS straight from a running Windows system, instead of using a USB drive.
Step 1: Download the Correct BIOS Update
Before you begin, please download the appropriate BIOS updates for your HP computer:
- Go to the Official HP Support Site
- Find your computer’s serial number (which is located on its back cover, or in the BIOS settings) and type it into the search bar of the website; then hit Enter to proceed.
- If your OS is not automatically detected by the website, choose it from the drop-down menu.
- If you’re unable to find the serial number, select the option “Let HP detect your product.”
- If prompted then install the HP Support Solutions Framework.
- Allow HP to detect your device by following the on-screen instructions.
- When your computer model is recognized, head over to the Drivers and Downloads section.
- Locate the BIOS update file and click Download.

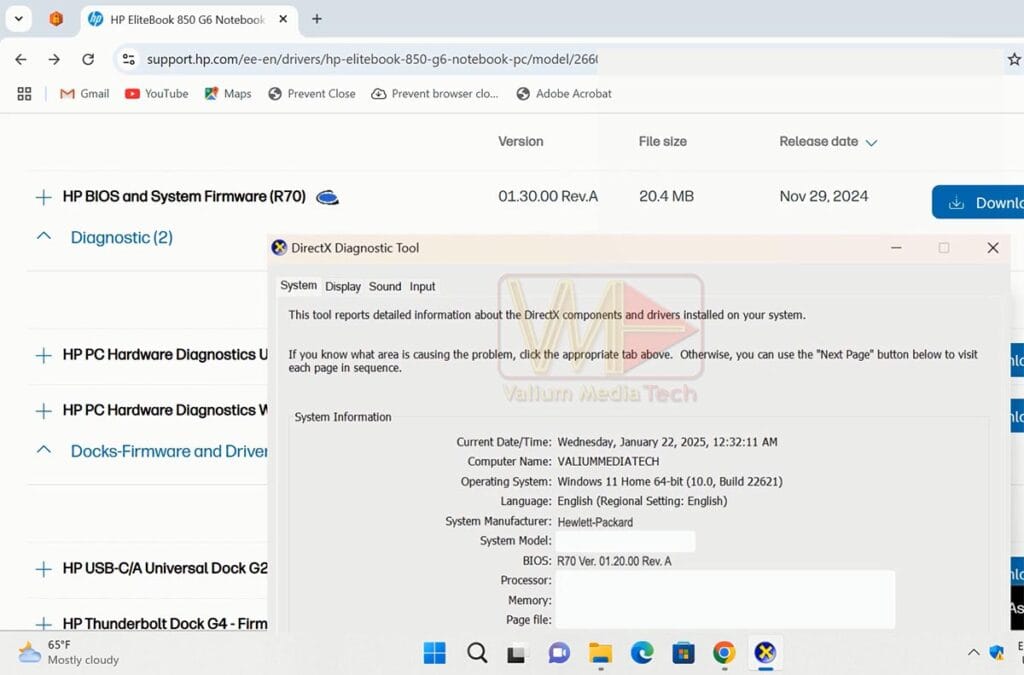
Step 2: Verify Your Current BIOS Version
Prior to doing so, verify your existing BIOS version to make sure you’re flashing a new update:
- Press Windows + R to open the Run dialog box.
- Open the DirectX Diagnostic Tool by typing dxdiag in the Run box and pressing Enter.
- Check if the above version is what you have and if it isn’t, please visit the HP website for the new version.
- If the website version is newer than the local version, proceed with the update.
Step 3: Prepare Your System for the BIOS Update
To make sure the update goes smoothly, take the following precautions before updating:
- Disable Antivirus Protection:
- Close your antivirus and temporarily disable real-time protection to avoid the interference.
- Turn Off BitLocker:
- Open the Manage BitLocker tool and Suspend BitLocker on the C: drive.
- After the update, when you restart the system, in some cases, the BitLocker locks the c drive and prompts for the recovery key, which causes boot issues, so this configuration is done to avoid this boot issue. But what to do if the C drive get BitLocker locked, you won’t be able to your computer or open your files without entering the BitLocker Recovery key, else you have to format the C drive and reinstall windows OS to use your computer.
- Open the Manage BitLocker tool and Suspend BitLocker on the C: drive.
- Ensure Power Stability:
- For laptops: charge the battery completely and plug the device into the wall.
- For desktops: Make sure that your desktop machine is plugged in and will not lose power.
Step 4: Install the BIOS Update
After your system is ready, here is how to update your BIOS:
- Find the downloaded BIOS update file and double-click it.
- Then hit Next and agree to the license agreement.
- Select Update (without USB drive) option and hit Next.
- Press Restart to start the update process.

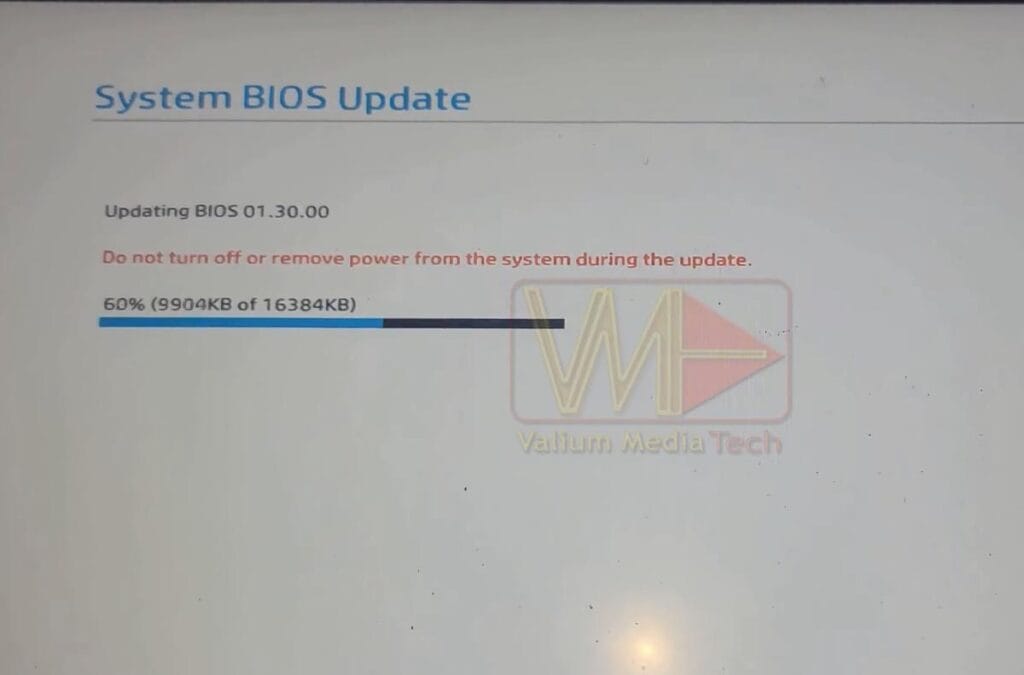
Important Notes During the Update
- Do Not Interrupt the Process: Avoid turning off or restarting your computer until the update is 100% complete.
- Multiple Restarts: Your computer may restart several times as it installs firmware for the BIOS, Intel Management Engine, Thunderbolt Controller, and other components.
- Time Required: The process can take 15 minutes or longer, depending on your system.
Post-Update Steps
- Go back and enable BitLocker: If you turned BitLocker off, enable it again after updating.
- Turn on Antivirus Protection: Enable real-time protection in your antivirus if you previously disabled it.
- Confirm the Update: Open DirectX Diagnostic Tool again to ensure BIOS has been updated.
Cautionary Tips
- Double-Check Compatibility: Ensure the BIOS update is applicable to your specific computer model. Installing the wrong BIOS can brick/render your computer unusable.
- Avoid Power Interruptions: A power failure during the update can brick your computer. Always use a stable power source.
Conclusion
Updating your HP computer’s BIOS is a simple process that, significantly, can help keep things running smoothly, providing greater performance, stability, and security. This guide will help you do it safely and correctly, without alienating yourself. If you found this guide useful, make sure you like and share it with others, and leave a comment below!
Disclaimer: BIOS updates can be risky. Follow all of the instructions closely and be sure to continue at your own risk.
VIDEO:
For more details about updating BIOS firmware in HP computers, watch the video below and subscribe to our YouTube channel for regular updates: